





What the person ordering sees
The person ordering opens your link, or the page on your site that holds the form. They see your heading and introduction (if you wrote them), your colors and font, and a row of steps at the top.
- Card Information. They fill in the fields from your template, such as name and title, and add a photo. The photo tool lets them choose a picture, move it, zoom, and rotate it. On a phone, the photo picker usually offers the camera as well as the photo library. You can hide fields, force capital letters, or fill fields in from the link.
- Preview Card. They see the real front of their card, and the back too if you show it. They can go back and change anything.
- Shipping Details (or Contact Info, if you ship everything to one address). They enter their name and email, confirm the email, choose how many copies (if you allow more than one), and give an address. If you ship everything to one address, they are not asked for an address.
- Done. They see a thank-you message. If you set a web address, a Continue button takes them there. An email confirmation follows.
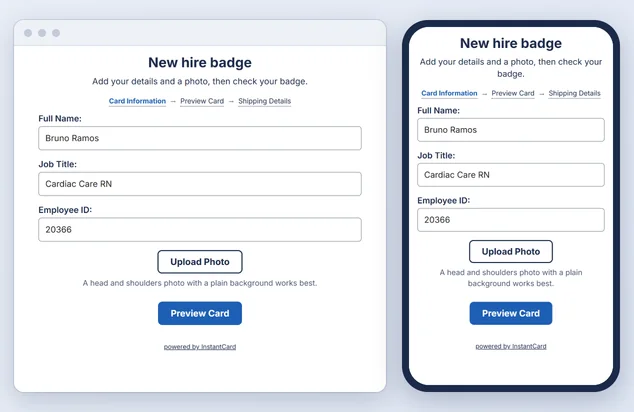
A template with no fields to fill in skips straight to the preview.
While an order is being placed, the form asks the person to wait and not close the window. Leaving the page during that moment shows a warning first.
At a glance
| Detail | What to know |
|---|---|
| Who it is for | Schools, associations, clubs, employers, and anyone whose people each order their own card |
| What you need | An InstantCard account with a funded prepaid balance, an owner or admin login, and at least one approved card template |
| What the person ordering needs | A web browser and a photo |
| Where it can live | A link you share, a snippet on your own site, or a WordPress plugin |
| Who pays | Your prepaid balance. The person ordering pays nothing. See "Who pays and how" below |
| Approval | Our team checks each form before it goes live |
| Cost | Building a form yourself is free. Cards are charged at your account's pricing. See pricing |
| Setup by us | Optional. If you would like us to set up the form for you, it is a one-time $200 on Small Business and Growth plans, and free on Enterprise |
| Code needed | None for a link or the WordPress plugin. A pasted snippet for your website |
ICO order forms are one of our ways to order. If you would rather order one card at a time in the web app, upload a spreadsheet, connect Zapier, or write code against our API, see Ways to order. This page is the full guide to ICO order forms.
Who ICO order forms are for
They fit any group where each person should order their own card:
- Schools and districts: staff, substitutes, volunteers, and student helpers order their own ID.
- Associations and clubs: members order a membership card from your site and it ships to their home.
- Employers: new hires, contractors, and remote staff order a badge, and it ships to them or to one office.
- Event teams: volunteers order a credential from a link in an email.
If you would rather order all the cards yourself, you do not need a form. You can order in the web app one card at a time, or upload a spreadsheet for a whole group. The web app and spreadsheet upload work for every account.
What you need first
- An InstantCard account with a funded prepaid balance. ICO order forms are part of prepaid accounts. If you pay as you go, or you have not added funds yet, the Integrations menu does not show up. If you pay as you go, talk to us about prepaid pricing.
- An owner or admin login. Only owners and admins can build and manage forms.
- An approved card template. The form orders one template. You choose from the approved templates in your account. If you do not have one yet, contact us.
Set up an ICO order form in the web app
Building a form yourself is free, and this section walks you through it. If you would rather we set it up for you, contact us: it is a one-time $200 on Small Business and Growth plans, and free on Enterprise.
Sign in at k2.instantcard.net, then open Integrations and choose Order forms. Your forms are listed there, each with its status and how many orders it took today.
Each form has one of these statuses: Draft, Waiting for approval, Live, Paused, or Needs changes (our team sent it back with a note).
Create the form
- Click Create an order form.
- Type a name. Only you and your colleagues see it, for example "Staff badges" or "Parent volunteer cards". It can be up to 80 characters.
- Under Which template will people order?, choose one of your approved templates.
- Click Create.
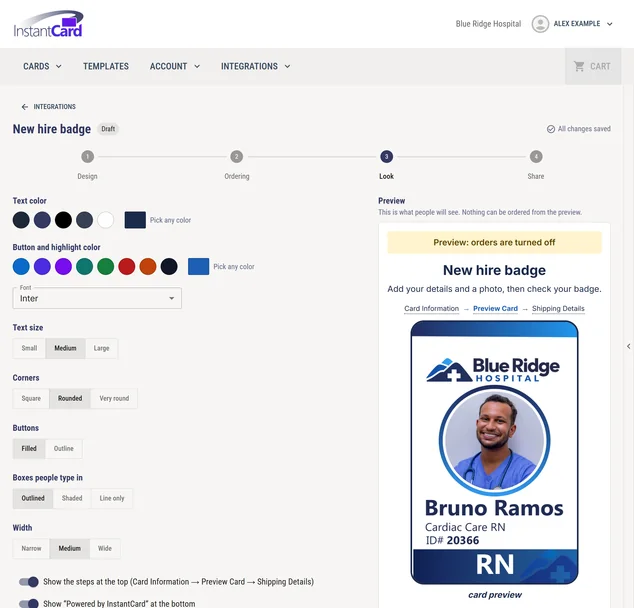
The first form in your account takes a few seconds to set up. The editor then opens with a live preview beside the controls. Your changes save on their own, and a note next to the form's name tells you whether the latest change is saved.
The editor has four steps: Design, Ordering, Look, and Share. You can jump between them in any order.
Step 1: Design
- Name. Change it any time.
- Colors and font. Pick one of eight ready-made color schemes (Blue, Indigo, Purple, Teal, Green, Red, Orange, Black) or choose your own. Pick a font from the list. The preview updates as you click. More styling options are in Look.
- Template. Choose another approved template if you want a different card. Changing the template clears your hidden-field and capital-letter choices, because those belong to the old template's fields. Once a form is live, its template is locked. To change it, pause the form first. A new template needs our approval again.
Step 2: Ordering
Who pays for each order? This is shown, not chosen. It follows your account. For a prepaid account it reads: "Orders are charged to your account balance." To change it, contact us.
Price and copies
- Show the price per card. On by default. Turn it off to hide the price.
- Let people order more than one copy. On by default. Turn it off and every order is one card.
- Most copies in one order. From 1 to 100. A new form starts at 10.
Shipping
- Ship outside the US and Canada. Off by default. Turn it on to accept addresses in other countries.
- Ship every order to one address. Turn it on to send every card to one place, such as your office, so you can hand them out. Enter a name or department, street address, suite or unit (optional), city, state, ZIP code, and a two-letter country code such as US or CA. People still give their name and email.
Fields on the form
- Show the back of the card in the preview. On by default. Turn it off if the back is blank.
- Ask for a photo before the preview. On by default for forms you build. People cannot see their card or order it until they add a photo. Turn it off and they can order without one, and the photo space prints empty. This option only appears for templates with a photo field.
- Hide it and Capital letters. A checklist of your template's fields. A hidden field is not shown to the person, but it is still part of the order (use it with "Fill in fields from the link"). Capital letters makes a text field print in capitals.
- Fill in fields from the link. Details are in "Fill in fields from a link" below.
After someone orders
- A thank-you message, ours or yours. You change it under Look, in "Change the wording."
- Then send them to this web page (optional). A web address that starts with
https://. People see a Continue button that takes them there.
Who gets the order confirmation email? Choose The person who ordered, which is the default, or Me, or someone in my organization and give an email address.
Daily limit. The most cards the form will take in one day. From 1 to 500. A new form starts at 25. See "Limits and protections."
Step 3: Look
Everything here previews instantly.
- Text color and Button and highlight color. Pick a swatch, or Pick any color and enter a hex code. In Chrome and Edge, the picker can also pick a color from anywhere on your screen.
- Font. System default, or one of 20 Google Fonts: Inter, Roboto, Open Sans, Lato, Montserrat, Poppins, Raleway, Nunito, Source Sans 3, Work Sans, Merriweather, Playfair Display, Oswald, PT Sans, Noto Sans, Rubik, DM Sans, Libre Franklin, Barlow, and Mulish.
- Text size: Small, Medium, or Large.
- Corners: Square, Rounded, or Very round.
- Buttons: Filled or Outline.
- Boxes people type in: Outlined, Shaded, or Line only.
- Width: Narrow, Medium, or Wide.
- Show the steps at the top. The row that reads Card Information, Preview Card, Shipping Details.
- Show "Powered by InstantCard" at the bottom. On by default.
- Heading (up to 120 characters) and Introduction (up to 1,000 characters). For example, "Order your staff ID card," and a line about what to have ready.
Advanced: Change the wording. You can rename more than forty pieces of text: step names, button labels, headings, the captions under the card pictures, the labels for name, email, and address, the messages people see when something goes wrong, and the thank-you message. Leave a box empty to keep our default. You can also rename any template field and add a line of help under it, for example "Use the name on your driver's license." Wording is plain text. To translate the form, rewrite the pieces in your language. A few fixed phrases cannot be changed and stay in English: the hover tips on the step names, "Your total is ...", "You are ordering ... cards", "Continue", "Start again", "powered by InstantCard" (you can hide that one), and the country list.
Step 4: Share
Where will this form be used? Choose Any website (the default) or Only these websites. See "Where the form may appear."
Ask for approval. See "Approval by our team." If your account is charged for orders, you tick a box first that reads: "I understand anyone with the link can place orders charged to my account, up to my daily limit."
Share your form. Three tabs: Link, Website, and WordPress. You can copy these before the form is live. They start working for visitors once it is.
Once a form is live you will also see Pause orders. Delete form sits at the bottom of this step for every form, live or not.
Share a link
The Link tab gives you a link that looks like this:
https://k2.instantcard.net/order/{form_id}Send it by email or text, add it to a newsletter, or put it on a button on your site. Anyone who has it can use the form, so keep the daily limit in mind. The page is hidden from search engines.
If you limit the form to certain websites, you can choose whether the link also works on its own. See "Where the form may appear."
Embed the form on your website
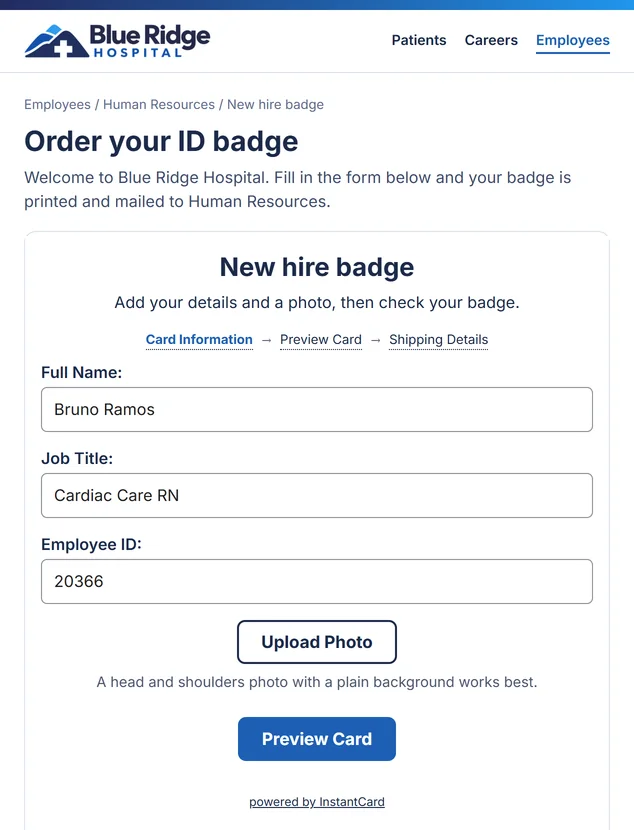
The Website tab gives you a snippet to paste where you want the form to appear. Whoever looks after your website will know where it goes. Copy it from the Share step so it has your real form ID in it. It looks like this:
<iframe id="icof-{form_id}" src="https://k2.instantcard.net/order/{form_id}" title="Your form name" style="width:100%;min-height:720px;border:0;" loading="lazy" allow="payment; camera" referrerpolicy="strict-origin-when-cross-origin"></iframe>Optional: automatic height. Paste this second snippet anywhere on the same page. The form then grows and shrinks to fit each step, so there is no scroll bar inside it. It only listens to messages from our form with your form ID.
<script>(function(){var id="icof-{form_id}",o="https://k2.instantcard.net",p="{form_id}";window.addEventListener("message",function(e){if(e.origin!==o||!e.data||e.data.icof!==1||e.data.form!==p)return;var f=document.getElementById(id);if(!f)return;if(e.data.type==="height"&&typeof e.data.height==="number"&&e.data.height>0){f.style.height=Math.ceil(e.data.height)+"px";}});})();</script>What is in the snippet. It is an iframe that points at your form's link. There are no account details, passwords, or tokens in it. This is the biggest change from the original ICO.
Tips
- Camera and photos. Keep the
allow="payment; camera"part exactly as copied. Phones show their own photo picker, which usually offers the camera. - Page builders. If your site builder strips iframes, paste the snippet into a "custom HTML" block, or use the WordPress plugin below.
- After the order. If you set a web address to go to after an order, a pasted iframe shows a Continue button. The WordPress plugin sends people there automatically.
- Pre-filled links. If you use "Fill in fields from the link," turn that switch on before you copy the snippet. The snippet then includes a one-line script that passes the page's address into the form. See the next section.
Fill in fields from a link
Turn on Fill in fields from the link in the Ordering step. Each template field then shows a small code under its name. Add the code to the end of the link as a question mark and a value:
https://k2.instantcard.net/order/{form_id}?{field_code}=Sam%20LeeThe exact rules:
- The code is the key and the value is what you want filled in. The code must match exactly, including capital letters. Spaces can be written as
%20or+. - Add more than one with
&:?{field_code}=Sam%20Lee&{other_code}=Teacher. - A field filled this way is hidden, so the person cannot change it on the form.
- An empty value does nothing.
?{field_code}=fills nothing and hides nothing. - Pick lists: the value must match one of the options exactly, or it is ignored.
- Check boxes:
true,1,yes, oronticks the box. Anything else leaves it clear. - Photos and QR codes cannot be filled in from a link.
On your own website, put the same ? part on the address of your page. The snippet from the Website tab, or the WordPress plugin, passes it into the form. Anyone can edit a link, so use this to save people typing, not to decide who may order.
Add the form with the WordPress plugin
If your site runs WordPress, you can add the form with a plugin instead of pasting code. Each form has its own plugin, made for that form, so you download it from the form in the web app: open Integrations in the web app.
- Download the plugin. Sign in at k2.instantcard.net, open Integrations and choose Order forms. On your form, click Get the code. That opens the form's last step, Share. Under Share your form, open the WordPress tab and click Download the WordPress plugin. You get a .zip file made for this form. Do not open it.
- Install and activate it. In your WordPress dashboard, go to Plugins, then Add New, then Upload Plugin. Choose the file, click Install Now, then Activate.
- Add the form to your page. Edit the page where the form should go. Add a Shortcode block and type
[instantcard_order_form].
[instantcard_order_form]About the plugin:
- No secrets. It holds no passwords, keys, or tokens and sends nothing from your server. Your visitors' browsers load the form from InstantCard, the way an embedded video or map loads.
- Needs WordPress 5.8 or newer and PHP 7.4 or newer.
- Settings are under Settings, then InstantCard Order Form: the form ID, height, largest width, alignment, and whether the page's link is passed into the form for pre-filled links. You can also add options to one shortcode, for example
[instantcard_order_form height="1100" width="640" align="left"]. - Automatic height and the after-order redirect are built in.
- Pre-filled links. If "Fill in fields from the link" was on when you downloaded the plugin, it passes the page's query into the form. Download again after you turn it on.
- More than one form. Use
[instantcard_order_form form="{form_id}"]. - Updates. Download again and upload it. WordPress offers to replace the copy you have.
- Not the plugin for WooCommerce stores. This plugin shows an order form on a page. To sell cards from a WooCommerce store, see InstantCard for WooCommerce, a different plugin with its own download.
Where the form may appear
Under Where will this form be used?, choose one:
- Any website (the default). Anyone with the link or the code can show your form. That is fine for most organizations, and your daily limit still applies.
- Only these websites. More secure. The form will not appear on other sites. Type each site, such as
example.com, or paste a full address. We store it ashttps://plus the site name. You can list up to 20.
Notes:
- List the exact address people see, with and without
wwwif both work. Each is a different website to a browser. - Test or staging sites need to be on the list too.
- Also let people open the link directly is a checkbox under "Only these websites." Turn it off if the form should only ever appear inside your website. Someone who opens the bare link is then pointed to your site.
- Changes take effect as soon as they save. After approval, you can add sites to the list or remove them (the list always keeps at least one site). To switch a live form from a list to "Any website," pause it first and ask for approval again.
This is a browser rule, not a lock. It controls which websites can show your form. A program could still send orders to it, so your daily limit is what protects your balance, whichever you choose.
Approval by our team
Every form needs our approval before it takes orders.
- Ask for approval. In the Share step, click Ask for approval. If your account is charged for orders, tick the box first.
- We review the form. Our team checks the template, who pays, and where the form can be used.
- We approve it or send it back. We either approve it, and the form goes live and we email you, or send it back with a note. A returned form shows Needs changes and the note is in the Share step. Make the change and ask again.
- Keep editing while you wait. While you wait, the form shows Waiting for approval. You can keep editing, and we check the latest version.
After approval:
- Most changes are live as soon as they save, such as colors, fonts, wording, limits, copies, and shipping.
- Two things need approval again: changing the template, and changing a list of websites to "Any website." For these, pause the form, make the change, and ask for approval. If your form changes in a way our approval does not cover, the Take orders again button is replaced by Ask for approval.
- Pause orders stops the form at once, and the link tells visitors it is not available right now. Take orders again turns it back on. Pause is the quick way to stop a shared link.
- Delete form removes it for good. The link and every pasted snippet stop working, and a new form gets a new link. Cards already ordered are not affected.
We email you the moment it is live. If you have been waiting longer than you expected, contact us.
Who pays and how
By default, orders are charged to your prepaid balance. The person ordering pays nothing. Each card is charged at your account's pricing. If you leave "Show the price per card" on, people see the price under the steps at the top. For US and Canada addresses the price includes shipping and reads "per card". If you turn on shipping outside the US and Canada, the price shows the card price only and reads "per card + postage".
Keep the balance funded. A form is a link that spends your balance for whoever opens it. Set a daily limit you are comfortable with.
Things to know about balance billing:
- The checkbox. When you ask for approval you confirm that anyone with the link can place orders charged to your account, up to your daily limit.
- There is no checkout step for the person ordering. They never enter a card.
Want the person ordering to pay? Contact us. We will tell you what is available for your account.
Shipping
- Where cards go. By default each card ships to the address the person enters. It ships by USPS within the US and Canada.
- Outside the US and Canada. Off by default. Turn on Ship outside the US and Canada and international addresses are accepted. Those orders go by USPS International, and the price is labeled "per card + postage." A ZIP or postal code is required for every country.
- One address for everyone. Turn on Ship every order to one address and every card goes there. People are not asked for an address.
- Choose a different shipping method. The original ICO let us set the shipping method for a form.
- When cards ship. Orders submitted by 4 p.m. ET normally ship the same day. How long the mail takes depends on where the card is going. The default thank-you message says to expect cards in 5 to 8 business days. You can change that message.
- Custom letters. The original ICO could include a letter from your organization with each card.
Limits and protections
- Daily limit. The most cards the form takes in one day. From 1 to 500. The default is 25. The day runs on UTC, so it resets at 7 p.m. Eastern in winter and 8 p.m. in summer. When the limit is reached, the form says "This order form has reached its limit for today. Please try again tomorrow."
- Copies per order. From 1 to 100. Default 10. Or one card per order.
- Attempts. The form also limits how many order attempts it takes in a day, and slows down repeated attempts from the same place. A person who hits this sees "Too many attempts. Please wait a few minutes and try again."
- No tokens on your page. The form places orders for you on our side. Nothing secret sits in your page or in the snippet.
- You can always pause. Pause works at any time, even if other changes are unsaved.
Moving from the original ICO
If you use the original ICO (the older embed code from before 2026: a small script and a <div> on your page, with an API token in the page), an ICO order form replaces it. Contact us and we will help you move.
What changes for you
- You choose when to switch. Keep the original ICO on your page until the new form is ready.
- You get a form in your account. You can change colors, wording, the daily limit, and more yourself, without asking us.
- No token in your page. The old code carried an account token in public. The new snippet carries none.
- No jQuery and no script files to host. The new snippet is one iframe.
- We can help with the setup. We read your old setup and build the matching form, then check it before it goes live.
How the move works
- Contact us. Send the address of the page that shows your order form.
- We build the matching form. We read the settings from your page and create the matching form in your account: template, colors, font, copies, shipping, redirect, fixed address, hidden fields, and capital-letter fields.
- You check the preview. We approve the form.
- Replace the old code with the new snippet or the WordPress plugin. For a page we host for you, we switch it.
- Retire the old token. When no page uses it, ask us to retire it.
Every original ICO feature, and where it lives now
| Original ICO feature | In ICO order forms |
|---|---|
Embed with a script and a <div> | One iframe snippet, or the WordPress plugin |
| Page hosted by InstantCard | A link you share |
| API token in the page | None. Orders are placed on our side |
| Charge your account | Default |
| Charge the person ordering (pay on checkout) | Contact us |
| Set the card price and keep the difference | Contact us |
| Show or hide the price | Show the price per card |
| Text color and highlight color | Look step |
| Font | System default or 20 Google Fonts |
| Override with your own CSS | Not available. The form sits in a frame, so your page's CSS cannot reach it. Use the Look step |
| Change every piece of text, translate | Change the wording, field names and help. About forty pieces; a few fixed phrases stay in English |
| One card or many | Let people order more than one copy, and a maximum |
| US and Canada only, or international | Ship outside the US and Canada |
Everything to one address (fixed_address) | Ship every order to one address |
Shipping method (ship_id) | Contact us |
| Redirect after order | Then send them to this web page |
| Show or hide the back of the card | Show the back of the card in the preview |
| Force capital letters | Capital letters |
| Fill fields from the query string | Fill in fields from the link |
| Photo upload, crop, rotate | Photo tool |
QR codes and vCard QR codes (qrcard), NFC byte counter | Contact us |
| Photo size (crop box scale) | Contact us. Staff can set it when moving an old page; the editor has no control for it |
Wording for orders held for approval (holding) | Change the wording |
| Staging mode with a test card | The editor preview shows the real form with orders turned off. It does not place a test order |
| Confirmation emails | To the person who ordered, or to you |
| Custom letter in every order | Contact us |
| Source code for advanced customization | Not offered. Ask us if you need something the Look step cannot do |
New with ICO order forms: a daily limit, a list of allowed websites, approval by our team, pause and resume, a live preview in the editor, and nothing secret in your page.
Frequently asked questions
Do the people ordering need an InstantCard account?
No. They open the link or your page and order. They never sign in.
Can I use more than one form?
Yes. Make one per template, per group, or per site. Each has its own link, limits, and look.
Can I change the template later?
Yes. If the form is live, pause it, choose the new template, and ask for approval.
What does it cost?
Building and sharing a form yourself is free. Cards are charged at your account's pricing. See pricing.
Can you set up the form for us?
Yes. Setup by our team is a one-time $200 on Small Business and Growth plans, and free on Enterprise. Contact us to start.
What if the daily limit is reached?
The form tells people to try again tomorrow. Raise the limit under Ordering, up to 500 cards a day.
Can people see other people's cards?
No. Each person sees only their own card in the form, and the form is hidden from search engines.
Does the person get a confirmation?
Yes. By default our order confirmation email goes to the person who ordered. You can send it to yourself instead.
Can I keep the form on my site only?
Yes. Choose Only these websites under Share and turn off "Also let people open the link directly."
Do I need a developer?
Not for a link or the WordPress plugin. A pasted snippet takes a minute for whoever edits your site.
What if my pay setting is pay as you go?
ICO order forms come with prepaid pricing. Talk to us about moving to prepaid.
Does it work in every browser?
The form needs a modern browser. Please test your link, and your page if you embed it, in the browsers your people use, including Safari and a phone, before you share it widely.
Can people upload a photo from a phone?
Yes. The photo button opens the phone's own picker, which usually offers the camera and the photo library. Keep the allow part of a pasted snippet as copied.
Troubleshooting
| What you see | Why | What to do |
|---|---|---|
| No Order forms under Integrations, or no Integrations menu | Your account is pay as you go or not funded yet, or you are not an owner or admin | Add funds or ask us about prepaid. Sign in as an owner or admin |
| "Integrations are available once you've added funds" or "Integrations come with prepaid pricing" | Same as above | Same as above |
| The form says "This order form isn't available." | The form is a draft, paused, or deleted, or the link is wrong | Check its status in Integrations. Ask for approval or take orders again |
| "This order form isn't available right now. Please try again in a few minutes." | A temporary problem on our side | Wait a few minutes. Contact us if it lasts |
| "This order form is available on example.com" | The form is limited to certain websites and "Also let people open the link directly" is off | Open it on your website, or turn that checkbox on |
| The frame is blank or says it refused to connect | The page showing it is not on your list of allowed websites, or your site blocks outside frames | Add the site under Where will this form be used? Check your site's security settings |
| "This order form has reached its limit for today." | The daily limit was reached | Wait until the limit resets, or raise it |
| "Too many attempts. Please wait a few minutes and try again." | Too many tries from one place | Wait a few minutes |
| "Preview your card before you order it." | The person skipped the preview | Go back and click Preview |
| "Your card is already confirmed. Start a new order to make changes." | The person went back after the card was confirmed | Start a new order |
| "This order has expired. Please start again." | The page was open a long time | Reload the form and start again |
| "Emails do not match." | The two emails differ | Retype both |
| "Please order between 1 and {max} cards." | The number of copies is empty, zero, or above the form's maximum | Enter a whole number in the allowed range |
| "Please fill in all required fields." | A required box is empty | Fill in the highlighted fields |
| "This form isn't set up for QR codes yet. Please contact the organization that sent you this form." | The template has a QR code field and the form has QR codes off | Contact us |
| Take orders again is replaced by Ask for approval | A change since approval needs our approval again | Click Ask for approval |
| A live form will not let you change the template | The template is locked while live | Pause, change it, ask for approval |
| The pre-filled link did not fill a field | The code has the wrong capitals, the value is empty, or a pick list value does not match | Check the code under the field name in the Ordering step |
| The form does not grow to fit | The automatic-height snippet is missing | Paste the second snippet, or use the WordPress plugin |
| The WordPress plugin shows nothing | The shortcode is missing, the form is not live, or the site is not on your list | Check each. A bad form ID prints a message for editors only |
| Orders are not going through | The form is paused or waiting for approval, or the daily limit was reached | Check Integrations. Contact us if it still fails |
Still stuck? Contact us and send the address of the page.
Related guides
- Ways to order: every way to order, from no code to code
- API reference
- Zapier guide
- Pricing