Introduction
Do you need an easy way to track attendance at an event? Are you looking for a quick-and-easy solution to check your participants in when they come to one of these kinds of events:
- Training classes
- Gym or sports club facilities
- VIP lounges, Sporting Events
- Conferences, conventions, or summits
- Product Launches, Press Conferences, Industry Expositions
- Workshops, Bootcamps, Continuing Education
- the list of possibilities is nearly limitless!
Well, you’ve come to the right place! Here is a very simpe how-to recipe to create your own RFID-driven check-in system, in just an hour or two.
By the way, you can choose to use QR codes instead of RFID cards to accomplish the same thing.
And the best thing is that, in this post, I will explain how this can all be done very cheaply (under $100).
Preparation: You will need just these three things:
- A laptop running Microsoft Excel
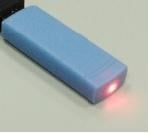
- A small LF (Low-Frequency) USB dongle reader which acts as an HID (Human Interface Device). This simply means that it works like a keyboard, playing out the RFID tag information as if it was typed on the keyboard.
InstantCard sells these readers for $85.00. Alternatively, various EM4200-compatible readers can be found on Amazon or other online stores. - Low Frequency RFID cards, which contain an EM4200 transponder. While there are several other RFID transponders which could also be used, I recommend these because they are the most common and least expensive. They are read-only, and contain a single factory-set UID (Unique Identifier).
InstantCard maintains inventory of these cards, and can provide photo ID cards custom-printed on EM4200 card stock for just an additional $3.50 per card.
Step 1 – Create Excel Spreadsheet
You will first need to create in Excel, on a separate tab (worksheet), a look-up table. This simple list will have, in the first column, the person’s name, and in the second column, the UID of their ID card. You should populate the table in advance with the names of your attendees in column 1, and use this list to order your printed ID Cards from InstantCard or your in-house card printing service. You should design the cards to include your logo, the name of the person, and whatever further information you wish to see appear on each ID card (membership level, event date/time/location, category of employee, etc.)
You will only be able to assign each one the UID number (column 2) after receiving the printed card back from InstantCard, and before handing the card to the person. When you receive the cards, you use the reader to read each UID, and place it in the cell associated with that person. Once you have these assigned, this will be your look-up table.
Step 2 – Write the Excel Macro
You will create another tab which will contain the logs of each successful read (check-in event). Column 1 will contain the person’s name, and Column 2 will contain the date/time stamp. This will be the Log Sheet.
You will then write a small macro which will:
- Read the UID number from the RFID tag
- Look up the corresponding name in the Look-up Table
- Create a check-in/check-out record in the Log Sheet, with the corresponding employee’s name in the first column and the date/time stamp in the second column.
You should specify what should happen in the case of a successful read (ie, the tag number is present in the table), or an unsuccessful read (ie, the tag number is unknown.) For example, the computer could display an appropriate message, or sound a beep/buzzer, etc. To improve the user interface, you should create in Excel a UID data entry box, where someone would type in the UID number (or in actual operations scan their card), triggering automatically a new entry (line) in the check-in sheet. After each successful read, the fields are cleared and the cursor is re-positioned to the UID entry cell.
That’s it! If you need help writing a simple macro like this, there are many sources of information available on the web. Any one of the popular AI tools will help you write and refine your macro. You can test your program by just typing in a UID, since reading the UID using the USB dongle will work identically to typing on the keyboard. Once you’ve got the basic macro working, you can improve the look/feel/functionality to fit your working environment and operational requirements.
Step 3 – Set up the USB RFID Reader
The reader is a very small USB device, which can be connected to your computer with a USB extension cable. It will read the tags up to about 1” away. The computer screen does not need to be visible to the user, and can be for example behind the check-in counter if there is one.
A small “target” can be printed on a sheet of cardboard, and you also can print instructions like “SCAN YOUR ID CARD HERE:”. This target can be located anywhere, beside the computer screen or on a countertop. Using tape or velcro, attach the USB dongle to the back of the cardboard, behind the target symbol. Then stand up the cardboard sign wherever it is convenient for new arrivals at your event.
You may wish to initially have one of your staff manning the check-in station, but after it has been proven, this solution can be left unattended.
Step 4 – Operations: Running the Excel Check-in Program
When the physical set-up of your computer and reader is set-up, you need just to fire up your Excel spreadsheet, and run the macro you created above.
Once the program is running, it should remain in standby mode, with the UID entry box displayed on the screen.
This is an extremely easy-to-use method of tracking who actually came to your event, or who utilized your facilities. It could even be adapted to check in and out items like beach towels at a swim club, or sports equipment at a country club. You can adapt it to track whether at any time someone is checked-in or checked-out. Don’t hesitate to use your imagination to adapt this basic process to the particular use-case you have in mind!
The added benefit is that your attendees will have a durable custom printed PVC card, with your organization’s logo, that they can re-use at future events.
If you need any help setting this process up, don’t hesitate to contact us at [email protected]. We of course offer all the RFID supplies you need to support you.
Good luck, and let us know if this how-to guide was helpful to you!